Do you sometimes find it difficult to read articles on your iPhone because of ads, banners, extraneous layout, social media icons, and too-small fonts? We certainly do, and there’s often a quick fix for the myriad ills of modern Web pages: Safari Reader. Whenever you see the Safari Reader
icon to the left of the site’s domain name in the address bar, tap it to switch to a cleaner, simplified view that dispenses with all the unnecessary trimmings and presents the content in a larger, more readable font. Tap the font
icon at the right side of the address bar in Safari Reader to change the font, font size, and even the background color. Not every website supports Safari Reader, and it can occasionally fail to format an article properly, but it’s a big win when you can use it.
By default, Apple populates your Mac’s Dock with all sorts of preinstalled apps and arranges them in a particular order. But there’s no rhyme or reason to the defaults, and you definitely shouldn’t be afraid to add, remove, and rearrange apps on your Dock. To add an app, drag its icon from the Applications folder to the desired spot on the Dock. To remove an app you never use, drag its icon far enough off the Dock that a Remove tag appears above the icon and then let go. To arrange the Dock icons in the order that makes the most sense to you, just drag each icon to your preferred location. We generally like to put our most-used apps in the left-most or top-most spots.
Apple’s Batteries widget is a little known but highly useful tool for quickly assessing which of your small Apple devices is lowest on power—something you may wish to do when traveling with only one charging cable. To access it, switch to Today view on the iPhone, accessible by swiping right on the Home screen or Lock screen. If the Batteries widget isn’t already there, scroll to the bottom, tap Edit, and tap the green + button to the left of Batteries in the list. You can also move it up or down the list by holding the three gray lines on the right, and sliding up or down.
Of course, if you just want to check the battery status on one device, that’s possible too. It’s easy to figure out how much power remains in your iPhone’s battery because of the indicator at the top right of the screen (swipe down on it to invoke Control Center and see the percentage on the iPhone X and later). On the Apple Watch, swipe up on the screen to see its battery percentage in Control Center. For AirPods, open the case and wait for the pop-up to appear on your iPhone’s screen.
At Apple’s Worldwide Developer Conference on June 3rd, the company unveiled the next versions of all its operating systems—macOS 10.15 Catalina, iOS 13 (and a new iPadOS), watchOS 6, and tvOS 13–along with the much-anticipated new Mac Pro and Pro Display XDR.
Nothing that was announced will ship until later this year—probably September—but we wanted to give you a quick overview of what’s coming from Apple later this year.
macOS 10.15 Catalina
With macOS 10.15, which Apple is calling “Catalina,” the company is working to bring macOS and iOS ever closer while preserving what makes the Mac special.
For instance, Catalina replaces the overloaded iTunes with three new apps that mimic those in iOS: Music, Apple Podcasts, and Apple TV. As such, all functionality of iTunes will be retained through those three programs. Reminders, Notes, and Photos also see significant enhancements that are mirrored on the iOS side, and a new Find My app on both platforms combines the capabilities of Find My iPhone and Find My Friends. Apple is even bringing Screen Time from iOS to the Mac to help you track and control your usage—and that of your kids—across all your Apple devices.
Some of these apps exist on the Mac thanks to Project Catalyst, an Apple technology that makes it easy for developers to convert iOS apps to the Mac. Apple used Catalyst internally last year to bring Home, News, Stocks, and Voice Memos to macOS 10.14 Mojave. This year, Apple is letting third-party developers use Catalyst, so once Catalina ships, we’ll see a flowering of new Mac apps coming over from iOS.
Another new technology, Sidecar, lets you use an iPad as a second screen for a Mac, either wired or wirelessly. Sidecar even enables you to use the iPad and Apple Pencil as a graphics tablet with apps that support such an input method. Two other new features will let you use a Sidecar-connected iPad to mark up any PDF or insert a sketch into a Mac document.
Catalina promises many more features, including some that will increase macOS security and others that will make the Mac much easier to use for people with disabilities. For instance, the new Voice Control capability lets a user run a Mac (or an iOS device) entirely with your voice—it’s amazing.
If you’re running Mojave now, you’ll be able to run Catalina too since the system requirements remain the same.
iOS 13
With iOS 13, Apple appears to be focusing once again on performance and refinements, rather than elaborate new features. The company states we’ll be seeing faster Face ID recognition, smaller app downloads and updates, and quicker app launches.
The most apparent new feature will be Dark Mode, which Apple is bringing over from Mojave. It displays light text on a dark background, which can be welcome when using an iOS device in a dark room without bothering others. It also may increase battery life on OLED-based iPhones like the iPhone X, XS, and XS Max. But keep in mind that research shows the human eye and brain prefer dark text on light backgrounds, so you may read more slowly and with less recall in Dark Mode.
Along with the apps mentioned previously that also improve in iOS, Apple said it has rebuilt Maps and its underlying database from the ground up, so you’ll see far more detailed maps, and you can zoom in for a street-level photographic view called Look Around.
Camera and Photos received attention as well, giving you faster access to effects and letting you apply effects to videos as well. In addition, you can also crop and rotate videos taken in the wrong orientation.
Other improvements include a new Sign In with Apple option for signing in to apps using your Apple ID, full text formatting in Mail, shared folders in Notes, SMB sharing in Files, iCloud Drive folder sharing, and support for USB thumb drives.
In terms of system requirements, iOS 13 drops support for some older devices, leaving the iPhone 6s, 6s Plus, and SE as the oldest iPhones supported, along with just the newest iPod touch.
iPadOS
Joining Apple’s other operating systems this year is iPadOS, a superset of iOS 13 that provides additional iPad-only features. In some ways, it’s nothing new, since the iPad has always had unique features, but it shows how Apple has been differentiating the iPad from the iPhone.
In iPadOS, the Home screen holds more icons in a tighter grid, and you can pin the Today View widgets on the side of the screen. Safari will be able to support complex Web apps like Google Docs, Squarespace, and WordPress, and it gains a download manager that lets you download files into the Files app.
Apple enhanced iPad multitasking so you can switch between apps in a Slide Over view, open multiple windows from the same app in Split View, and use App Exposé to navigate among your app combinations. In addition, text editing improves significantly, with direct access to the cursor and easier text selection, as well as new three-finger gestures for cut, copy, paste, and undo. The iPad even gets full-featured font management, and you’ll be able to buy fonts from the App Store.
iPadOS won’t work on many older iPad models, though it is compatible with all iPad Pro models, the fifth- and sixth-generation iPad, the iPad mini 4 and fifth-generation iPad mini, and the iPad Air 2 and third-generation iPad Air.
watchOS 6
With watchOS 6, Apple is working intently on health and fitness capabilities for the Apple Watch. The company has added a Noise app that can warn you when sounds approach dangerous levels and a Cycle Tracking app that helps women monitor their periods and predict windows of optimal fertility. And, the Activity app has picked up trending features so you can see how you’re doing across time in a number of health metrics.
Apple has also untethered the Apple Watch from the iPhone to an extent, allowing developers to create standalone watch apps that don’t require a companion iPhone app. This allowed them to create an App Store on your wrist, letting you download new apps with no phone nearby.
Other new watchOS 6 apps include Audiobooks, Calculator, and Voice Memos. Plus, once you upgrade to watchOS 6, you’ll be able to choose from more faces and additional complications.
As with watchOS 5, watchOS 6 will work on all Apple Watch models other than the first generation, but not all features are available on all models.
tvOS 13
The big news for tvOS 13 is that it gets multi-user support, so everyone in a household will be able to have their own personalized experience. (Speaking of which, the HomePod will also support multiple users with iOS 13.)
Apple has redesigned the tvOS Home screen to show previews, added a slide-in Control Center like in iOS and watchOS, and updated the Music app to show lyrics in sync with the currently playing song. The screensaver also goes under the ocean so your cat can be entertained by all the fish in the sea.
Finally, in a move that will significantly enhance the forthcoming Apple Arcade game subscription service, both tvOS and iOS will support the Xbox One S and PlayStation DualShock 4 game controllers.
Mac Pro and Pro Display XDR
Although the Worldwide Developer Conference is mostly about Apple’s operating systems, the company took advantage of the keynote to show off the completely redesigned Mac Pro and its companion screen, the Pro Display XDR. The technical specs of both are astonishing—Apple has done what looks like a fabulous job of designing the most modular, flexible, and powerful Mac ever, combined with a display that competes against reference monitors costing tens of thousands of dollars.
The Mac Pro will rely on Intels workstation Xeon W processors with 8 to 28 cores, and you’ll be able to configure it with up to 1.5 TB (that’s terabytes!!!) of RAM. It has eight PCI Express expansion slots, into which you can install MPX modules that contain up to four AMD Radeon Pro graphics cards for massive number crunching performance. Another slot can hold Apple’s new Afterburner accelerator card for ProRes and ProRes RAW video acceleration, and a half-length slot contains Apple’s I/O card with two USB-3 ports, two Thunderbolt 3 ports, and to 10 Gb Ethernet ports; there are two more Thunderbolt 3 ports on the top of the case. Storage starts at 256 GB of SSD and goes up to 4 TB.
All this fits into a stainless steel frame with an aluminum case that lifts off to provide access to all sides of the Mac Pro. It has a massive 1.4-kilowatt power supply and relies on three fans and a blower to keep the unit cool. It even has handles on the top and optional wheels in case you need to move it around regularly.
Accompanying the Mac Pro is Apple’s first monitor in years, the Pro Display XDR. It’s a 32-inch 6K screen that supports P3 wide and 10-bit color that can display more than 1 billion colors accurately. It’s also incredibly bright and can sustain 1000 nits of full-screen brightness or peak at up to 1600 nits.
If your eyes glazed over reading those specs, this new hardware isn’t for you. Apple is aiming it at high-end professionals, the sort of people who happily spend many thousands of dollars on new hardware to enable faster video editing, data processing, or other performance-intensive tasks. The base-level Mac Pro will start at $6000, and the Pro Display adds another $5000. Even the Pro Stand (which provides tilt and height adjustment, plus rotates to portrait orientation) for the Pro Display costs $1000, so a tricked-out Mac Pro setup could easily exceed $20,000. So no, this is not a Mac for “the rest of us,” but it’s great to see Apple ensuring that the most demanding Mac users can stay on the platform.
iCloud Photos (which Apple previously called iCloud Photo Library) is wonderful when it’s working correctly, and an extremely powerful tool. Take some photos on your iPhone, and they appear on your Mac and iPad a minute later. Delete unnecessary shots and edit the others on your Mac, and your iPhone and iPad reflect those changes almost immediately. But what if changes aren’t syncing? Photos in iOS and macOS can pause syncing for a variety of reasons, and sometimes it doesn’t restart when it should. To see if that is the issue, go to the very bottom of the Photos view in Photos, where it lists the number of photos and videos you have stored. Below that number is the sync status. If it has a reason and a Resume link, click or tap Resume to start it again.
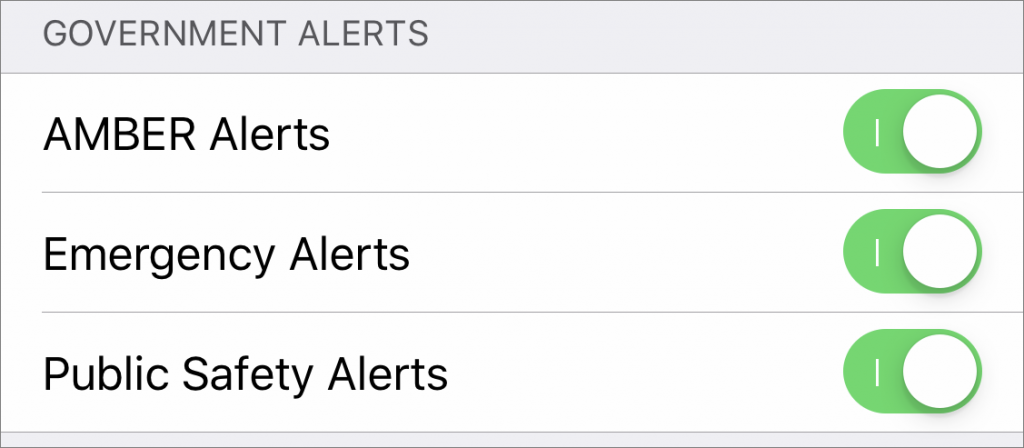
Have you ever gotten an emergency alert on your iPhone, telling you about an abducted child or public safety emergency? That’s the Wireless Emergency Alerts (WEA) system, at least in the United States, although some other countries have similar systems.
The WEA system enables authorized national, state, and local government authorities to send alerts about public safety emergencies to mobile devices in the affected area. Also included in the WEA system are AMBER Alerts designed to solicit public information when law enforcement is searching for a missing child. Some US states also broadcast Silver Alerts about missing adults, particularly senior citizens with Alzheimer’s, dementia, or other mental disabilities. The alerts are always meant to be useful, either to you or to law enforcement working on a case.
Unfortunately, the alerts aren’t always informational or well targeted. In addition, they break through the Do Not Disturb cone of silence, and there’s no way to change their tones. Most folks may not appreciate being woken up at 2 AM to be told to look for a white Ford that’s potentially associated with a missing child. Plus, although the AMBER Alerts are generally popular with the public, research suggests that they’re largely ineffective.
More concerningly, the loud noise that accompanies the alerts can be dangerous, either to your hearing if you’re wearing earbuds when the alert comes through, or to your life if you overreact while driving.
In iOS 12 in the US, you’ll see three categories of government alerts at the bottom of Settings > Notifications: AMBER Alerts, Emergency Alerts, and Public Safety Alerts.
In most countries, Apple lets you turn off all three categories, but you could still receive what are being called “Presidential Alerts,” which are meant to reach everyone in the country during a national emergency. The Federal Emergency Management Agency, which manages the WEA system, tested the Presidential Alert system for the first time in October 2018.
What should you do? It’s entirely your decision, of course, but in most situations, it’s probably best to leave all three alert types enabled. If you find yourself being annoyed by repeated AMBER Alerts or Silver Alerts, particularly if you’re unlikely to be in a location where you could be helpful, you might want to toggle the AMBER Alerts switch off. But the Emergency and Public Safety alerts could be essential, especially if you’re in an area prone to hurricanes, tornadoes, and here in Northern Michigan, Blizzards.
If you’ve already disabled the alerts because of poor targeting—being notified of something of concern only to people hundreds of miles away is just an interruption—you might consider turning them back on later this year, since the FCC requires carriers to improve the geo-targeting starting November 30th, 2019.
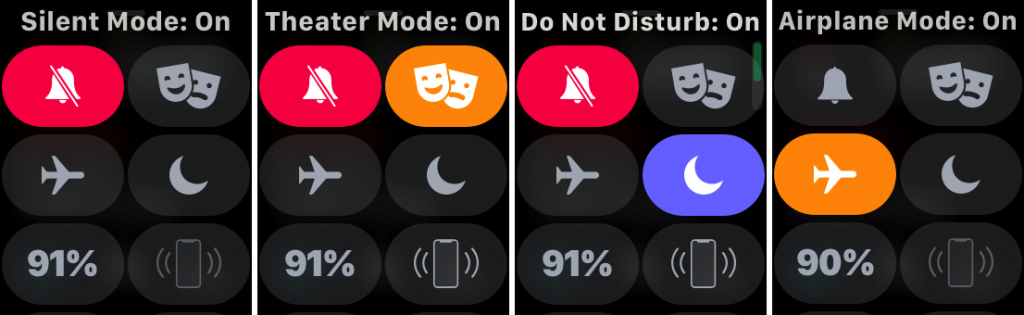
Is your Apple Watch failing to turn on its screen when you raise it, display notifications from your iPhone, or even update the time zone? watchOS has four modes accessible from Control Center (swipe up from the bottom of the screen) that are useful but can cause confusion if you forget to turn them off, or even make it seem your Watch is malfunctioning :
Silent Mode: In Silent mode, your Apple Watch won’t make any sounds, but will provide haptic feedback you can feel on your wrist.
Theater Mode: When in Theater mode, your Apple Watch not only turns on Silent mode, it also keeps the screen dark unless you tap the screen or press a button.
Do Not Disturb: As with Theater mode, enabling Do Not Disturb turns on Silent mode and prevents notifications from lighting up the screen.
Airplane Mode: Invoking Airplane mode turns off the Apple Watch’s Wi-Fi and Bluetooth radios, and the cellular radio if your watch supports that. Without Wi-Fi and Bluetooth, the watch can’t communicate with your iPhone and will thus miss notifications and time zone changes.
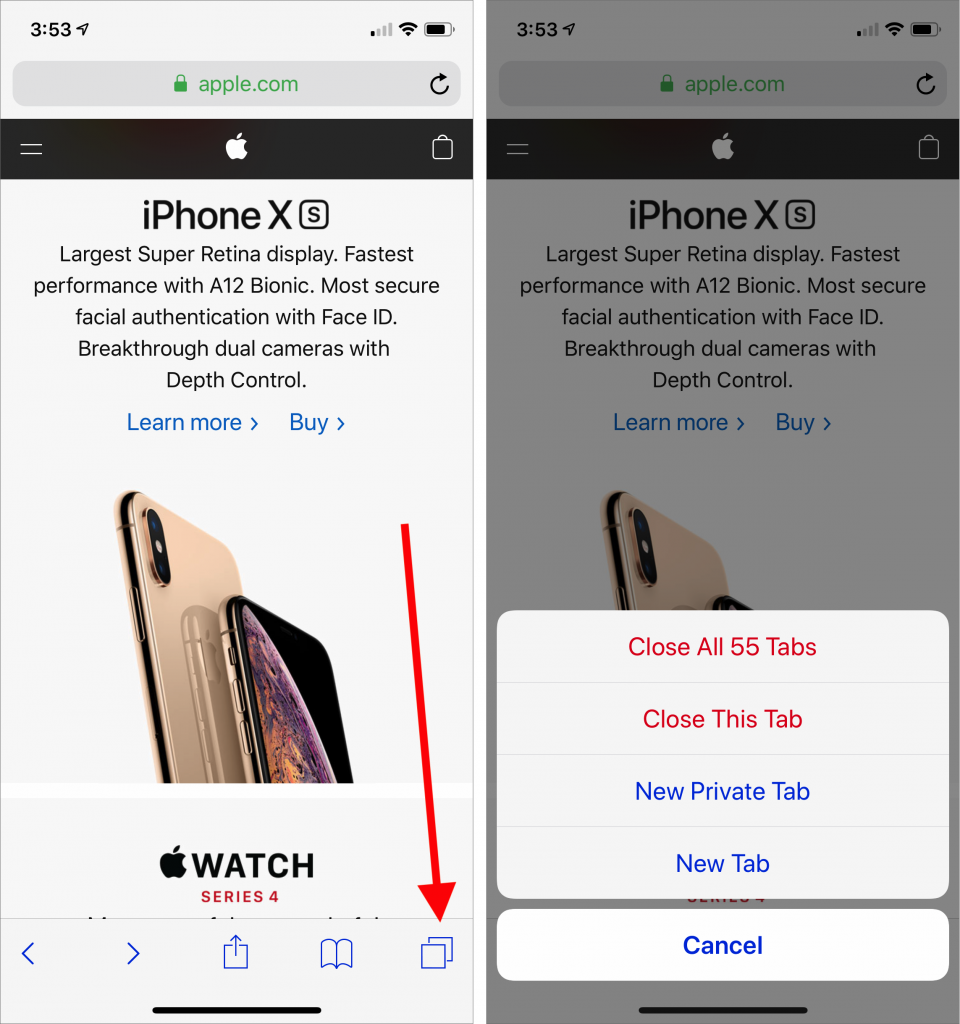
Every time you tap a link to open a Web page in Safari on your iPhone or iPad, it automatically opens a new tab. You may not have even been aware that happens. That’s fine until you realize that you have oodles of old tabs open, making it difficult to find any particular tab. To close all your old tabs in one fell swoop, press and hold on the tab button, then tap Close All X Tabs in the popover that appears.
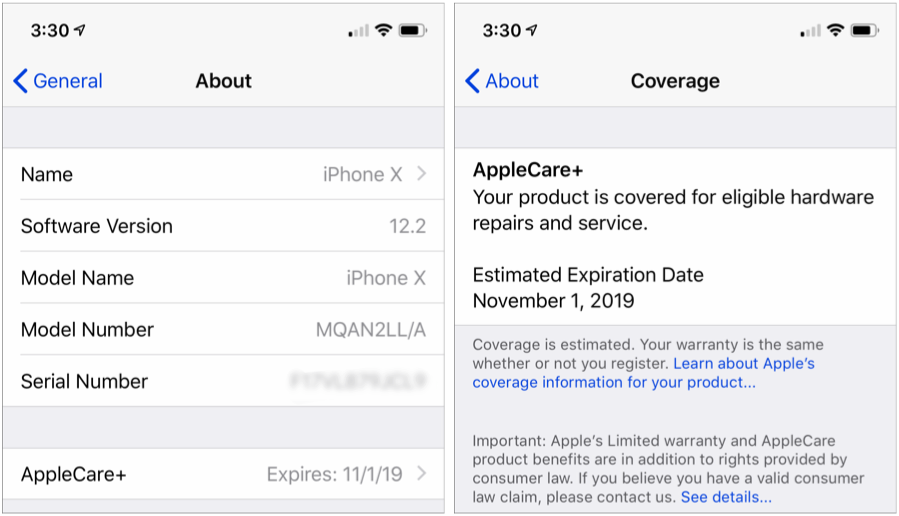
With luck, you should never need to check your iPhone’s or iPad’s warranty status. But bad things do happen to good devices. In iOS 12.2, Apple has just made it easier to determine if your device is still under warranty or covered by AppleCare+. Go to Settings > General > About, where you’ll find a new entry that’s either called Limited Warranty (the basic Apple warranty) or AppleCare+ (the extended warranty you can buy). The entry shows the expiration date, and tapping it provides more details on the Coverage screen. If your iPhone or iPad doesn’t have AppleCare+ but is eligible for it, you can even buy it from this screen. You won’t see anything if your device is out of warranty and no longer eligible for AppleCare+. If you aren’t running iOS 12.2 or cannot run it, you can find your coverage details here.
There’s little more frustrating than missing an important call or text because your iPhone was in Do Not Disturb mode or because the Mute switch was engaged. If there are certain people—a spouse, parent, or child—whose calls and texts you always want to break through the cone of silence, iOS has a solution: Emergency Bypass. When enabled for a particular contact’s ringtone or text tone, Emergency Bypass ensures the sound and vibration will happen no matter if Do Not Disturb is on or the Mute switch is active. To set up Emergency Bypass, edit the person’s contact card in the Phone or Contacts app, tap Ringtone, and enable Emergency Bypass. You can turn on Emergency Bypass separately for calls in the Ringtone settings and for texts in the Text Tone settings. And remember, you can always set someone’s tone to None and enable a vibration instead to ensure Emergency Bypass doesn’t allow a call to interrupt a movie, play, or concert.
When you follow a link in Safari, you generally don’t know where you’re going to end up. That’s fine most of the time, but what if you’re concerned that a site might be trying to trick you into going somewhere malicious? Safari provides an convenient way to look at the URL under a link before you click. On the Mac, choose View > Show Status Bar, hover your pointer over the link, and look at the bottom of the window. In iOS, touch and hold a link (don’t press for 3D Touch) until a popover appears, showing the link and giving you options for opening it. The most important thing to look at is the domain—us.norton.com in the screenshots. It should match where you think you’re going, or at least look similar. If the URL is dubious or different, don’t follow the link.
In theory, it should be easy to move the cursor in text on an iPad or iPhone—just tap where you want the cursor to go, or press and hold until the magnifying circle appears over the cursor and then slide it around. In reality, it can be fussy and annoying because our fingers are a lot wider than the cursor itself. Starting in iOS 9, Apple came up with a better solution—trackpad mode—and in iOS 12, it was extended to devices that lack 3D Touch.
In trackpad mode, you turn the onscreen keyboard into a virtual trackpad. Just as on a Mac laptop, moving your finger around the virtual trackpad moves the cursor in the text above. How you use trackpad mode differs slightly between the iPad and iPhone.
Trackpad Mode on the iPad
On an iPad, open any app that allows text input, like Notes, and bring up the keyboard. Touch the keyboard with two fingers, and you see the letters disappear from the keyboard as it switches to trackpad mode. Immediately swipe your fingers (or just one, you can lift the other up) around to move the cursor within the text. Or, for the new approach, touch the Spacebar and pause briefly to switch to trackpad mode.
You can also select text in trackpad mode. If you start with two fingers, instead of swiping immediately after entering trackpad mode, pause with your two fingers down briefly, which causes iOS to switch to selecting text. Then move your fingers around to change the colored selection. If you start with one finger on the Spacebar, position the cursor where you want it and then tap anywhere on the grayed-out keyboard to start selecting.
For easier selection of chunks of text, put the cursor in a word, let up, and then tap once with two fingers to select the word around the cursor, twice to select the sentence, and three times to select the entire paragraph. To expand or contract the selection, keep your fingers down and drag the selection cursor. To deselect text, tap once on the keyboard with two fingers.
You can use trackpad mode even if you have an external keyboard attached. Tap in a text input area, place two fingers anywhere in it to engage trackpad mode, and then move your fingers to reposition the cursor (again, you can lift one finger up after you start). To select text, put the cursor inside a word, release your fingers, and tap once to select the word, twice for the sentence, and three times for the paragraph.
Trackpad Mode on the iPhone
Before iOS 12, trackpad mode on the iPhone worked only on models that supported 3D Touch, which prevented use on the iPhone 6 and earlier and the iPhone SE. iOS 12 added another approach, which is good because 2018’s iPhone XR also lacks 3D Touch.
To engage trackpad mode on an iPhone that supports 3D Touch, press firmly on the keyboard with one finger—you’ll feel the iPhone’s Taptic Engine simulate the feel of a click. Keep your finger down to move the cursor around. Apple’s new approach to invoking trackpad mode works on all iPhone models—touch the Spacebar and pause briefly to switch to trackpad mode. In either case, if you need more room, you can move your finger off the keyboard image right onto the text.
On 3D Touch iPhones, to select a word, relax your finger pressure slightly without removing it from the screen, and then press again. It’s quite similar to the feel of clicking on a MacBook trackpad. You can even double-press—again, with a slight relaxing of the finger first—to select the current sentence and triple-press to select the entire paragraph. Keep dragging after selecting to select more text by the word, sentence, or paragraph.
When using the Spacebar approach to invoking trackpad mode, you can still select text. As on the iPad, position the cursor where you want it and then tap anywhere on the grayed-out keyboard to start selecting. The two-fingered tapping on the normal keyboard that works on the iPad doesn’t work on the iPhone, unfortunately.
Trackpad mode takes a little getting used to, but it’s so much better than the previous selection methods that it’s worth making yourself practice until it becomes second nature.
It’s maddening to want to read a serial number or other bit of fine print that you can barely see. But fret no longer—your iPhone or iPad makes a fabulous magnifying glass!The first way to enable Magnifier is in Settings > General > Accessibility > Magnifier. With this turned on you can bring it up by pressing the Home button (for Touch ID devices) or side button (for Face ID devices) three times quickly. If that’s too hard to remember, you can also add a Magnifier button to Control Center in Settings > Control Center > Customize Controls. The special camera viewfinder is zoomed automatically, but you can change the zoom level with the slider, tap the flash icon to turn on the LED light (if available on your device), enable a filter to change the color or contrast, or lock the focus by tapping the lock icon. You can also freeze the image by tapping the white shutter button, which is great for grabbing a picture of a tiny serial number on the back of some device (tap that button again to resume using Magnifier). To leave Magnifier, press the Home button or swipe up from the bottom of the screen.
If you’re an Apple Music subscriber, you may know that it can play music that’s related to a particular artist or track—just tell Siri, “Play a radio station based on the Beatles” to get a bunch of songs from the likes of the Rolling Stones, Simon & Garfunkel, and Elton John. That radio station will show up in the Radio screen in the iOS Music app and in iTunes on the Mac. But you may not have realized that Apple Music can create a special radio station just for you, based on tracks you’ve played before, added to your library, or “loved.” To create it, just tell Siri, “Play my radio station.” Once made, it shows up with all the other radio stations, with your name underneath—it may not appear immediately. This can be a great way to get a selection of songs you’re almost certain to like, and the more you use Apple Music, the more it should adjust to and learn your particular listening habits.
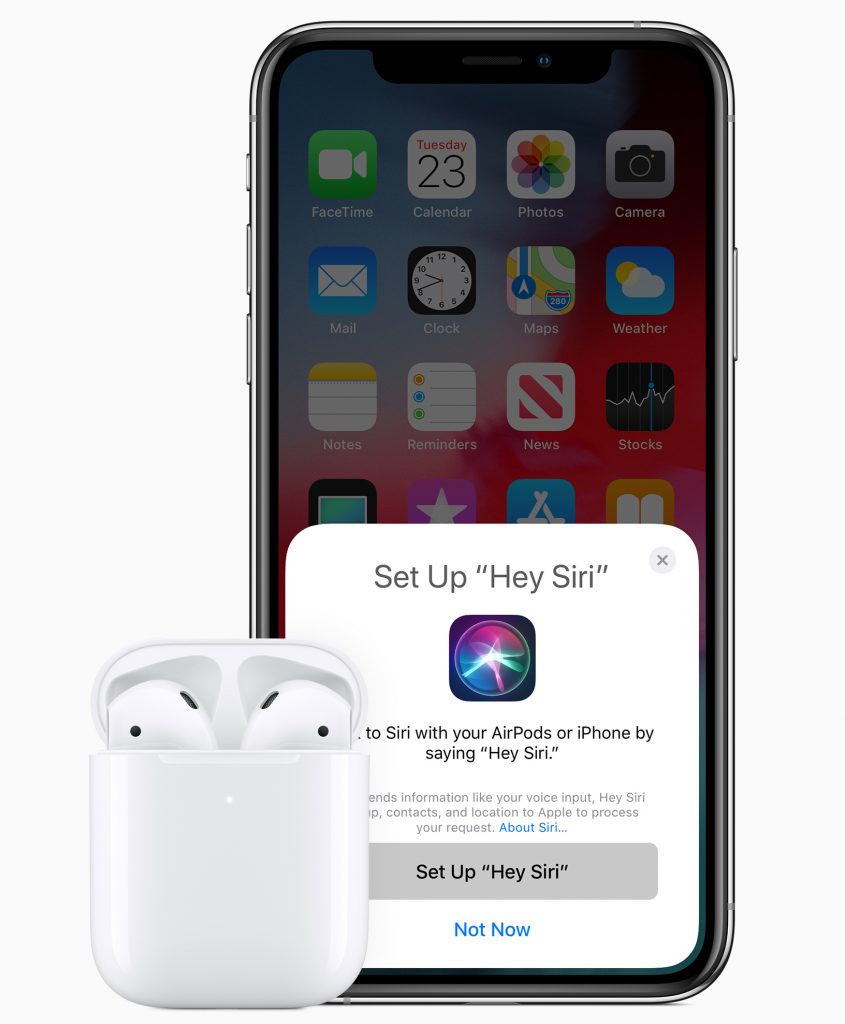
If you use Apple’s AirPods, you’re probably a fan. But if you haven’t tried them, you may not realize what you’re missing. They pair quickly and reliably with all your Apple devices, provide great audio quality, and sit comfortably in most people’s ears (more so than the wired EarPods, due to no wire pulling them out and a slightly larger profile). The AirPods are Apple’s most popular accessory—the company sold 35 million in 2018.
Apple has now unveiled the second-generation AirPods, the first hardware update since their initial release in December 2016. A new Apple-designed H1 chip designed for headphones provides even faster connections, more talk time (up to 3 hours), and the convenience invoking Siri with “Hey Siri.” (With the first-generation AirPods, you can configure a double-tap to bring up Siri—when the AirPods are active, look in Settings > Bluetooth > AirPods.)
The new AirPods remain $159 with a standard Lightning-based charging case, but Apple has also introduced the Wireless Charging Case, which is bundled with the new AirPods for $199 or available separately for both the first- and second-generation AirPods for $79. The Wireless Charging Case works with any Qi-compatible charging mat. It features a tiny LED indicator light on the front of the case to show the case’s charge status, and if you buy from Apple online, you can now get 19 characters of personalized engraving on the front of the case.